
Hey my main is mad-ad I use this side blog to keep posts I want to save handy and my drafts clear
76 posts
Latest Posts by madadreferencearchive - Page 2
hot artists don't gatekeep
I've been resource gathering for YEARS so now I am going to share my dragons hoard
Floorplanner. Design and furnish a house for you to use for having a consistent background in your comic or anything! Free, you need an account, easy to use, and you can save multiple houses.
Comparing Heights. Input the heights of characters to see what the different is between them. Great for keeping consistency. Free.
Magma. Draw online with friends in real time. Great for practice or hanging out. Free, paid plan available, account preferred.
Smithsonian Open Access. Loads of free images. Free.
SketchDaily. Lots of pose references, massive library, is set on a timer so you can practice quick figure drawing. Free.
SculptGL. A sculpting tool which I am yet to master, but you should be able to make whatever 3d object you like with it. free.
Pexels. Free stock images. And the search engine is actually pretty good at pulling up what you want.
Figurosity. Great pose references, diverse body types, lots of "how to draw" videos directly on the site, the models are 3d and you can rotate the angle, but you can't make custom poses or edit body proportions. Free, account option, paid plans available.
Line of Action. More drawing references, this one also has a focus on expressions, hands/feet, animals, landscapes. Free.
Animal Photo. You pose a 3d skull model and select an animal species, and they give you a bunch of photo references for that animal at that angle. Super handy. Free.
Height Weight Chart. You ever see an OC listed as having a certain weight but then they look Wildly different than the number suggests? Well here's a site to avoid that! It shows real people at different weights and heights to give you a better idea of what these abstract numbers all look like. Free to use.
burning text gif maker
heart locket gif maker
minecraft advancement maker
minecraft logo font text generator w/assorted textures and pride flags
windows error message maker (win1.0-win11)
FromSoftware image macro generator (elden ring Noun Verbed text)
image to 3d effect gif
vaporwave image generator
microsoft wordart maker (REALLY annoying to use on mobile)
you're welcome
Gonna start a post with blank memes. Please add any you have on hand and reblog to spread them.


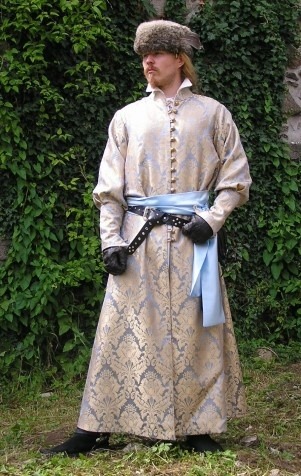
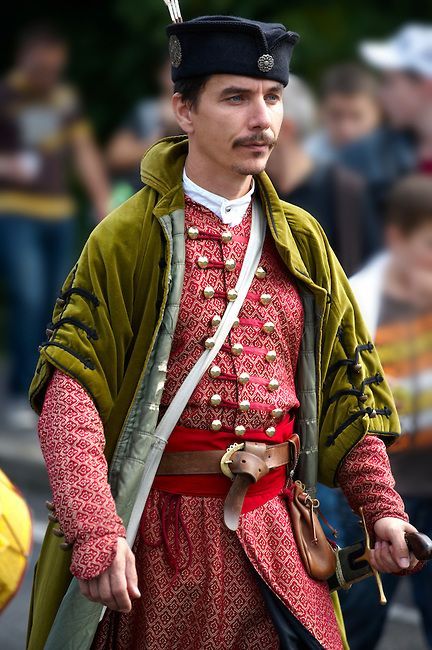
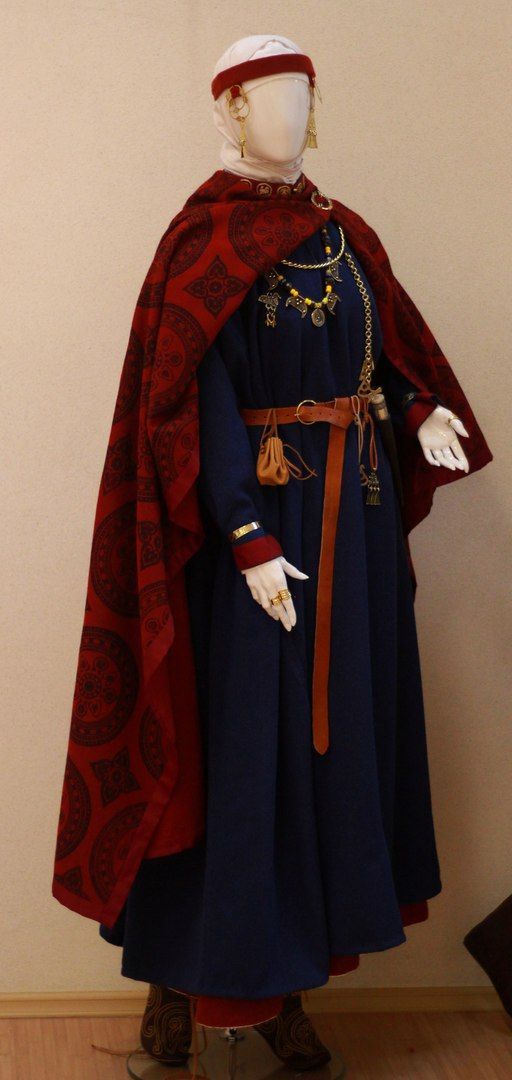
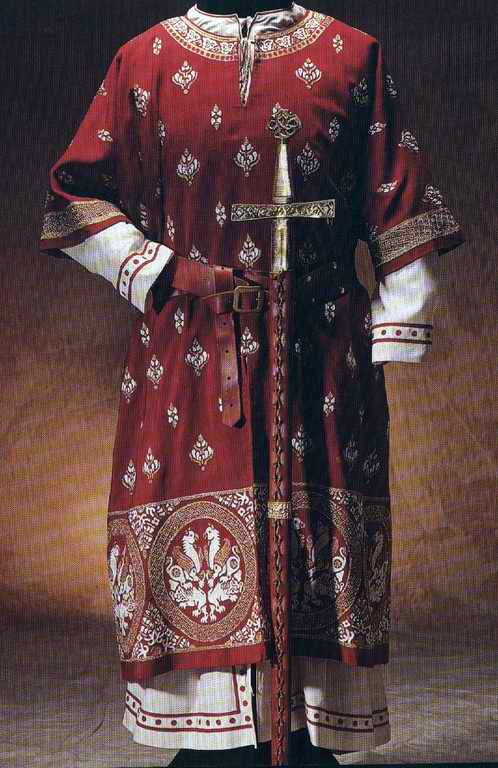
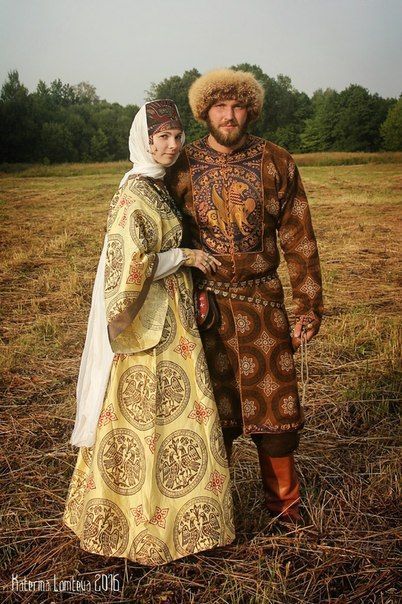
Don’t get me wrong, I love it when people design medieval fantasy clothing based on western European fashions, because they were awesome (did somebody say chaperon?) but there was lot of great design in eastern Europe and the Byzantine Empire too.
I’m pretty sure the second picture is actually 16th century Hungarian dress, but I’ll let it in because it looks cool.


spotify users: what is the current title of your daylist and what are the first three songs?
Executive Dysfunction Study Tips
(compiled by us, for us; not a comprehensive list by any means, just the ones that work well of our brain specifically)
dress in a Nice Outfit for the Aesthetic. Studying in slacks and a button-down or knit sweater or similar with a mug of tea has completely different vibes (and much more productive ones) than studying in pajamas, even if the clothes aren’t as comfortable. Besides, the faster we get work done, the faster we can change into Comfy Clothes and relax.
in a similar vein, Beverage + Studying Music. Our go-to is corn tea and the LoZ ocarina of time soundtrack. lyrical music is fine for doing calculations, but for essays its instrumental only since the lyrics can fuck with the writing process.
make that grid of everything you need to do from this post, with Check Boxes next to each thing for Checking Things Off (or you can cross them out if that’s more satisfying). Also gives an order and instruction for Starting The Thing which is usually the hardest part.
Imitate School Environment with “periods”, AKA studying for 40 minutes with a 5-10 minute “passing period” in-between, in which getting up and walking around is required. do not do “fun stuff” (reading/YouTube/etc) during passing period, or getting brain back on task will be Hell. our brain works best with a clear structure. Also, Set Alarms.
SNACKS!! snacks that are crumb free and don’t disturb the working process are best. I like pumpkin seeds, smoked salmon, apple/pear/peach/etc slices, cheese, and similar. washed bowls of fruit (grapes, cherries, strawberries, etc) make my fingers wet every time I eat them which is inconvenient, and I can’t eat most junk foods for allergy/health reasons (+ grease, cheese dust, etc are similarly impractical)
from this post, “make timelapses on your phone of u doing your work” providing the exact amount of Nervous Energy from being “watched” to be productive, without the anxiety of being criticized from having someone actually watch you. For an extra kick, actually post them to YT.
have Separate Windows open for studying vs for fun stuff. I usually have three windows open on my laptop at all times – one for YT/reading (relaxing stuff), one for studying, and one for writing.
set a Consistent Time To Work and Time To Stop Working, because brain stop working late at night when get tired, but brain also no work as soon as we get home from class, because we’re exhausted and need to take a break + eat first.
in a similar vein, have a Work Time Ritual to get brain in the mood. Do the same thing every time its time to work so that you can pavlov yourself. For example, having a glass of water and and doing five jumping jacks, taking a shower, or getting changed into Studying Clothes. ADHD brain hates Transition Between Activities and also Starting Task so make it fun or relaxing.
finally and most important!!!! sleep well, eat well, and when its time to stop working (NOT when work is done, but when its Time To Stop), take a break and do something relaxing. Work on hobby or lie in bed and read fanfiction. We don’t work past 10:00PM and we aren’t out of bed past 11:00PM. aint nothing going to get done if your body isn’t in a shape to get it done. As a system, sometimes we can see the body as a tool/instrument/machine separate from the mind/identity/personality, and you gotta keep that shit well-maintained or its gonna break down on you and you’ll have to take it to the repair shop.
Los Angeles Times! See me, more patients and the studio!
So you may have wondered why Habersham's story followed so quickly on the heels of Lucky the Bear's, and the reason is, it was a bit of a teaser.
Over the past few months, I have been interviewed for almost 2 hours by a reporter for the LA Times. Then a photographer came out to the hospital and took photos of me and the hospital and the patients I had at the time (for another two hours!). And then a few weeks ago, another photographer came out to take portraits of the patients I had then. Including one of Habersham. Then, yesterday, September 10, this appeared as the cover of the LA Times Calendar section:

That's Habersham before his surgery. And a wonderful play on Tears for Fears for the title of the story. :-) There's a two page spread inside the paper, and you can read it, and see a lot (if not all) of the photos online here. If the link doesn't work, you can also go to the LA Times and search "toy hospital" in the search box on the site and you should find the article that way too.
Anyway, as you may imagine, I've been doing a bit of a happy dance about the story all weekend. And I really wanted to share it with all of you because a) I thought you might enjoy the article and b) the reporter found me in part because of this blog which you all have chosen to read and follow and like over the years, so you all deserve thanks for the article too!
beth
The biggest lie in fanfiction is that everyone has a first aid kit in their house. I have never owned one in my life

But Aston was suffering from EDS, a genetic disorder that members of her family also had. Although EDS generally affects connective tissue — like joints and blood vessel walls — the vascular type, which Aston was thought to have had, is a more serious form of the syndrome that the Mayo Clinic says can “cause the walls of your blood vessels, intestines or uterus to rupture.”
every time i see those posts like ‘what food from a show did YOU always wanna try’ i go lol none? but i just remembered im a liar

i always wanted the fucking soup brock made in the pokemon anime
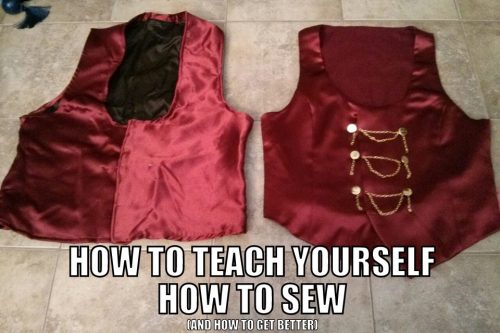
A lot of people don’t believe me when I say that I’ve only been sewing for a little over 3 years. Previous to that I had only really ever sewn plushies, pajama pants or pillows during Guide Guide workshops aka I could put fabric through a machine and sew in (sort of) straight lines but not much else. I had never used a clothing pattern before, I had never used anything other than a basic straight stitch, and I had never bought fabric. October 2012 was the first time I ever sewed any garments completely from scratch and those were my Fushimi from [K] vest and coat and now this October (2015) I will be competing at the Master’s level for cosplay craftsmanship. So I figured I’d give a short rundown of how I taught myself how to sew and how I improved.
1) I watched a lot of Project Runway (the earlier seasons… Annnndreeee, where is Annnndreee?). While this didn’t help much in actual sewing, it got me familiar with a whole lot of terminology and types of fabric and outfits. Plus it also showed me where people tended to take shortcuts and when those shortcuts tended to fail.
2) I got a very basic sewing machine and I READ THE ENTIRE USER MANUAL. I started off on a Singer Simple which was a gift from my parents (who actually bought it 2 years earlier but never gave it to me thinking I’d never use it… HA!) and I went through every single English page of that user manual. I became familiar with all the parts of my machine, how to thread it, how to change bobbins, how to clean it, how to fix jams, all the different stitch types, and I practiced sewing a bunch of random stitches on scrap pieces of fabric just to see what they looked like and how they changed when I changed different tension settings.
3) I got a basic sewing book (from like 1965… it’d probably better to get an updated/current book) that acted as a glossary of sewing terms. I had no idea what 50% of the stitches I needed to use were called so this became very useful later when I bought my first pattern.
4) I bought my first patterns and chose something fairly simple to start off with which was a lined vest (followed by an immensely more difficult jacket). I went with Simiplicity patterns after doing a lot of googling for the most new-user-friendly patterns.
5) Then I FOLLOWED THE PATTERN INSTRUCTIONS. It seems like an obvious step but even now I sometimes skip a step and then later regret it. Everything the pattern said I needed, I bought. I bought the specific types of fabric, interfacing, thread, buttons, I did not deviate from their suggestions for the first trial run. Then I read through the pattern instructions, cut out all the corresponding pieces for my size and got to work. The key was to work slowly and re-read things as I went. I also used my sewing book and google to help better explain some of the instructions that were not 100% clear to me just starting out. I also looked up youtube video tutorials on how to iron seams, sew darts, properly clip curved edges, sew button holes, and finish inside seams. Research, research, research!
6) To re-iterate: TAKE YOUR TIME. Slow and steady wins the race. It took me probably a solid 4 days to sew a very simple vest that would probably take me maybe a couple hours now but damn it was one of the cleanest looking vests I had ever sewn. I made sure not to rush anything and gave myself lots of time.
7) I kept practicing. The more I sewed, the more familiar I became with how garments were put together and where I could change things to better fit my size or how to alter things to better fit the garment I was trying to create. I experimented whenever I could on scrap fabric to see what would and would not work for stitching and ironing.
3 years later and I can now draft my own patterns and sew dozens of different types of garments with dozens of fabric types. I would attribute 90% of my learning experience to taking it slow at first and researching as I went. I didn’t allow any guesswork on the first couple of projects I worked on because how would I ever learn if I didn’t look into how something was properly done? Google, youtube, tutorial blogs (wink wink), reference books, and pattern instructions are you friends, do not take them for granted.
Pictured at the top on the left is the first Kirishiki vest I (rush) sewed in July 2012 without following instructions and trying to do it myself. The vest on the right is from December 2012 after I decided to take my time and follow instructions and actually learn while I was sewing. You can improve 100% just by taking your time, doing some research and following the instructions.
Bonus: What I bought for my sewing starter kit
A green rotary/cutting mat. They can be really expensive but I have been using my large mat for 3 years straight and it works wonders at not only protecting the surface you are working on, but giving you a nice sturdy pinning and cutting surface that is self-healing and doesn’t get destroyed by pins and exacto knives.
1 large and 1 small pair of orange handled sewing scissors.
A 6" x 24" clear sewing ruler.
A pack of white/blue fabric pencils.
A box of standard pins, plus a pin cushion.
A pack of extra bobbins.
A pack of standard sewing needles for hand-sewing.
A pack of standard sewing needles for my machine.
An iron and mini ironing board.
Happy sewing!
-Heather
People with low spoons, someone just recommended this cookbook to me, so I thought I'd pass it on.
I always look at cookbooks for people who have no energy/time to do elaborate meal preparations, and roll my eyes. Like, you want me to stay on my feet for long enough to prepare 15 different ingredients from scratch, and use 5 different pots and pans, when I have chronic fatigue and no dishwasher?
These people seem to get it, though. It's very simple in places. It's basically the cookbook for people who think, 'I'm really bored of those same five low-spoons meals I eat, but I can't think of anything else to cook that won't exhaust me'. And it's free!


wake up babe, new reason to ditch FANDOM/Wikia just dropped
![Zelda Wiki twitter:
Fandom refused to take this wiki down after we returned to independence and now it looks like they are using generative A.I. for "quick answers" which are spreading misinformation.
Please stop using Fandom. We do not approve of our past work being used like this.
[Screenshot of FANDOM Zelda Wiki with Quick Answers feature]](https://64.media.tumblr.com/55df791ecf5b885002a8ef164826ff07/cca355bad3b8715c-54/s500x750/5d7627c400c21ccfd92e36a8de7737d0b96b702a.jpg)
![Zelda Wiki twitter:
IN one case, it provides "answers" for a completely unrelated franchise.
[Screenshot of FANDOM Zelda Wiki with Quick Answers feature]](https://64.media.tumblr.com/dba0adad0a30f2d590ae05c4f7c0a839/cca355bad3b8715c-7d/s500x750/53137cab0b665a2309be4c05cefe2186b22d7186.jpg)
Previosuly
corporate monster infested with ads which devoured Gamepedia and other companies (feat me on their shit policies, SEO and migration process)
turning entire articles into ads if paid enough
limited functionality preventing admins to even fight vandalism
merging and removing of LGBT+ wikis (and forced domain change for educational [think serious] wikis to "fandom")
official wiki status has no meaning in controlling shit
very much censorship (same good ol' allergy to adult stuff)
gets paid by US Navy to advertise their events (one, two)
Alternative free wiki hostings (aka wiki farms)
Miraheze - started in 2015, non-commercial - no ads and runs on donations, wide array of MediaWiki features, wide array of allowed types of wikis and content, much autonomy for projects, custom domain and private wiki options
wiki.gg - started in 2022 by former Gamepedia staff, limited to video games, accent on involvement of game devs and thus hosting official wikis, has ads for anons (but only of games having wikis here)
Telepedia - started in 2022, limited to entertainment (although might allow other themes upon review), has ads for anons, replicates Miraheze structure
WikiTide - started in 2023, no ads and runs on donations (but also tied w/ premium version called WikiForge), largely replicates Miraheze but has stricter content policies, custom domain option
Other free options I'm aware of are either too limited in allowed content or are very outdated/unstable in technical department to recommend here (or in case of Neoseeker - I'm completely unfamiliar with it, and can't say anything about it), but you still can check them out, alongside paid hostings, on this MediaWiki page.
If you (or your community) are brave and dedicated enough you can go with self-hosted MediaWiki instance (aka independent hosting), like JoJo Wiki (who started on Wikia and succeed at overtaking the SEO) or NIWA wikis. This option, of course, requires funding and technical knowledge, but it's still very much possible.
How to find existing alternative/independent wikis
try to use "-fandom" filter for search query in Google, or use other search engines like Bing or DuckDuckGo
Indie Wiki Buddy browser extension - it modifies search engine results and performs redirects based on its centralized list of independent wikis; a new indie wiki has to be requested/submitted to get added [ Firefox / Chrome ]
Redirect to wiki.gg browser extension - same as IWB but for wikis moved to wiki.gg (as I understand, works automatically without dedicated listing) [ Firefox / Chrome ]
(simple) Redirector browser extension - in case the wiki is neither on IWB or wiki.gg, and it doesn't filter out search results - only performs redirect on whatever you get; a redirect has to be set manually - see this tutorial [ Firefox / Chrome ]
Fuck FANDOM, support real people, support indie wikis
Did I daydream this, or was there a website for writers with like. A ridiculous quantity of descriptive aid. Like I remember clicking on " inside a cinema " or something like that. Then, BAM. Here's a list of smell and sounds. I can't remember it for the life of me, but if someone else can, help a bitch out <3
Hey this is dumb but you know that silly Google search thing of “who will not go to heaven” and it brings up a list of things including short people like I know it’s just a dumb Google search but also like??? I hate it, I hate all the things it brings up as reasons like who even wrote that and posted it I feel like sometimes I get too panicky about stupid things even tho I know who the Lord is y’know ??! 😭
I can speak from experience by saying don’t believe everything you read on the internet because anyone can write anything and now we also have AI which can also make up false words including pictures.
You don’t need to be a certain height to get into Heaven. Why? All people are created in the image of God and height is not a sin. See, I don’t need to even bring the Catechism out for this one so do not be afraid, my brother or sister. God loves you!!!
Now then, here is something you can do with me. I am already half way through it, but I think this prayer is very special—- God told me to pray it.


https://mamot.fr/@setthemfree/106014810050613790
https://www.eff.org/deeplinks/2021/03/google-testing-its-controversial-new-ad-targeting-tech-millions-browsers-heres

does anyone know if i can like block sites from appearing in my google images searches??? i keep getting those awful ai generated things with a hand coming out of a man's neck and just straight up not what i was looking for, because this was in a search for "curly hair in medieval paintings". it happens every time i search for anything vaguely art-reference-like and it's so fucking annoying and it clutters my search results so much. i don't wanna add specific commands to the query every time too, what i need is like a browser extension or something


If there was a way to run SUPER MEGA AD BLOCKER on this website I fucking would
not me realizing that with tumblr moving the icons to the side, it eliminates xkit, which was situated at the top. what a scumbag move
filterable picrew database!
hey pals!! i'm working on a filterable, tagged collection of picrew i like. right now there's about 60 picrew (and other such makers such as those from neka or meiker) in there with tags for things like fashion, hair options, skin colors, specific features like horns or headscarves, and body types. you can search for multiple tags at a time and filter out tags you don't want. the whole thing is organized in a big grid of sample results from the picrew in question, so you can see the style at a glance and click it for more images and the url, but you can change the view and organization system however you like.


the link is here!!! feel free to share this wherever. i'm still going through my folders and adding more makers, so expect lots of updates real soon.
i'm hoping this makes it easier for people to find picrew that suit them and their characters, especially in cases where it's unfortunately harder to find certain features like dark skin options and fat bodies.
have fun!!!! i hope this is helpful for people!!!
Table of Contents
Abbreviated Arguments
Preface
1. Philosophy of Ethics
2. Paradigms of Choice
3. Fallibility of Empathy
4. Fallacy of Bodily Autonomy
5. Value of Futures Like Ours
6. Parallels with Feminism
7. Exploitation of Women
8. Humanity as an Inviolable End
9. Incongruity of Right to Refuse
10. Consistent Life Ethic
11. Family Planning
12. Unsubstantiated Claims
13. Efficacy of Laws
14. Uncertainty of Personhood
Answers and Submissions
Links to crisis support for pregnancy, parenting, and post-abortion
Send a Question
Secular Pro-Life Advocates
Learn More
Disclaimer
Summer Horror
I recently hosted a TTRPG game jam with the premise of summer horror.
The games that came out of it were fantastic, and can be found by going to the submissions tab on the jam page.
A couple spotlights, though!
Ritual is a Wicker Man / Midsommar style cult horror game that doesn't use a GM. Instead, players who aren't in a scene switch to playing cultists, and as the PCs get killed off more and more cultists can concentrate on the remaining players.
Letters Home is a game about being at summer camp and gradually realizing something is Terribly Wrong with the place. It's two player, and involves actually exchanging letters, and is a great little device for co-writing a horror story.
Sleepless Seas is a solo fishing game that mirrors stuff like Dredge. The tone is gloomy and liminal, and there's the lingering implication that you might be stuck in some sort of piscine purgatory.
Ash Trapped In Cracked Lips is difficult to describe, but the phrase I would use is "Cormac McCarthy's Dark Souls." It's also big, the biggest game submitted to the jam, and features adventurers wandering through a burned out afterlife where there's little movement beyond the circling of vultures.
Haunt is built on the same engine as Ritual, but focuses instead on Hill House style hauntings. Like Ritual, it's a focused, scary experience where the ghosts multiply as the living players dwindle, and it packs a stellar sense of atmosphere.
There are also several more games in the jam, including some of my own, and again they can all be accessed via the jam page.
Summer is ending, but if you want to get in one last good scare (or prepare for autumn), check some of these out!


Pirate all your favorite shows, movies, and games while you still have the chance.
Some people have asked me if I can publish my mapmaking tools. So I developed a software. 🙂
Here is the result:

i am not joking we need to force teach cooking in schools. like. it is an essential thing for survival. do you know how easy it is to make things if you know even the bare bones shit about how cooking works. we need to teach teenagers how far you can take an onion and some other veggies it’’s sad that people grow up not knowing how to prepare literally anything. and i’m not talking about oh this home ed class taught me how to make chicken nuggets at home i’m talking about learning the balancing of sweetness and acidity and saltiness and bitterness and shit like that and techniques and oil temperatures and how meats cook. it needs to be taught because it’s literally not even that difficult and it matters so much
i have a few resources i look to consistently but i'm gonna plug anatomy for sculptors as One Of The Most Useful. great if you're a 3D artist, INVALUABLE if you're a 2D artist. gives you turnarounds of specific limbs/fiddly body parts like ears. great especially if you're referencing a photo and start looking at an individual part like 'wait, what the hell is going on in there'


fucked up how cooking and baking from scratch is viewed as a luxury…..like baking a loaf of bread or whatever is seen as something that only people with money/time can do. I’m not sure why capitalism decided to sell us the idea that we can’t make our own damn food bc it’s a special expensive thing that’s exclusive to wealthy retirees but it’s stupid as hell and it makes me angry
Visible Mending
Introduction:
Visible mending is a decorative way to fix up an item. Instead of trying to make your mend as invisible as possible, the idea is to make it part of the garment's design.
Visual mending is not a single technique: it's more of a mindset. If you've got an item you love, it deserves to be mended, and if you're going to put that love into stitches, why not show them off?
That being said, there are some specific techniques that are popular with visible menders. Let's take a look!
Sashiko:
Sashiko is a type of traditional Japanese embroidery that is used to both decorate and reinforce fabric. In visible mending, sashiko is often used to cover up holes with patches or to reinforce thinning fabric. This technique uses a variation on the running stitch.
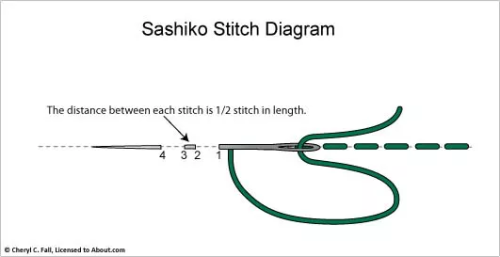
(Image source) [ID: sashiko stitch diagram: the distance between each stitch is 1/2 stitch in length.]
Some resources on sashiko:
SashiCo on YouTube: sashiko livestreams and information on the cultural aspect of sashiko.
Written tutorial by Upcycle Stitches.
Free sashiko templates by TheSpruceCrafts.
Fixing jeans with sashiko by Soluna Collective.
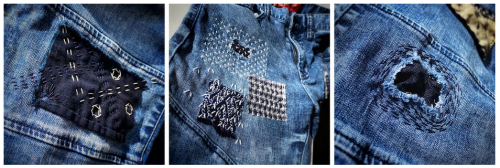
(Image source) [ID: three examples of sashiko embroidery on jeans fabric.]
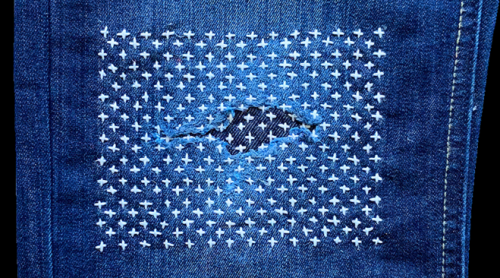
(Image source) [ID: sashiko embroidery with white thread on blue jeans fabric.]
Embroidery:
Regular embroidery is also a popular technique to accentuate your mends. Check out my embroidery 101 post to learn how to get started. You can embroider patches, or use embroidery to hide or accentuate any stitches you've made to fix holes. Embroidery's also a great way to cover up stains.
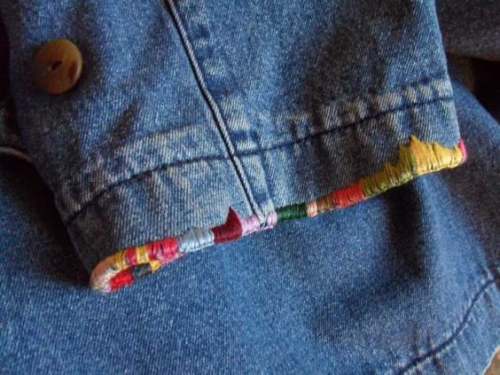
(Image source) [ID: colourful embroidery floss covers a worn sleeve edge of a jeans jacket]
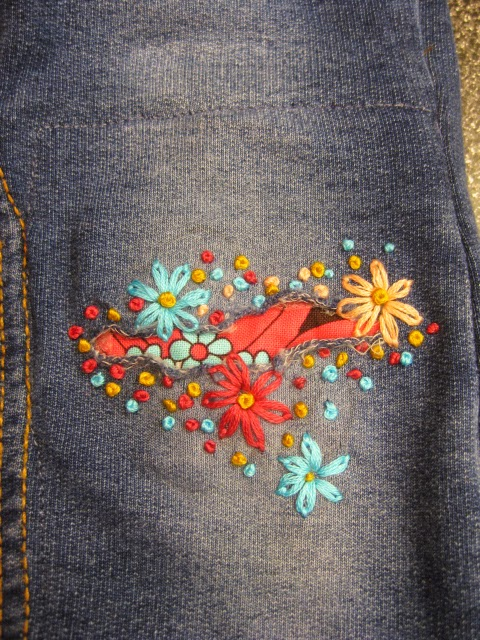
(Image source) [ID: colourful flower embroidery surrounds a hole in a pair of dark gray jeans. Fabric with a red and black flower print peaks out of the hole.]
Patches:
There are many ways to add patches to a garment. My tutorial on patches is a good place to start if you want to make custom-shaped patches to sew on top of your fabric. You can also sew your patch on the inside of your garment and have it peek out from beneath the hole you're trying to fix. Fun ideas for this are lace or superheroes.
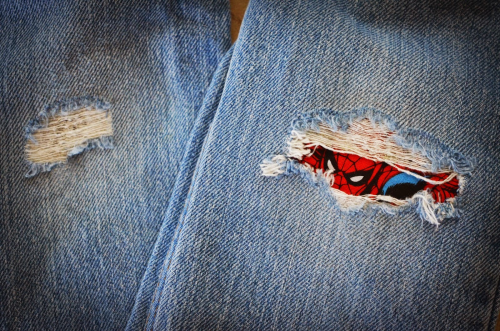
(Image source) [ID: Spiderman peaking out of a rip in a pair of blue jeans.]

(Source) [ID: a red flannel heart-shaped elbow patch on a gray knitted sweater.]
Darning:
Darning is a technique used to repair holes in fabric by using running stitches to weave extra fabric over the hole as to fill it up again. While traditionally darning is done in an invisible way by using the same colour of thread as your fabric, you can also use contrasting colours to accentuate your fix. Check out this written tutorial on darning by TheSpruceCrafts.
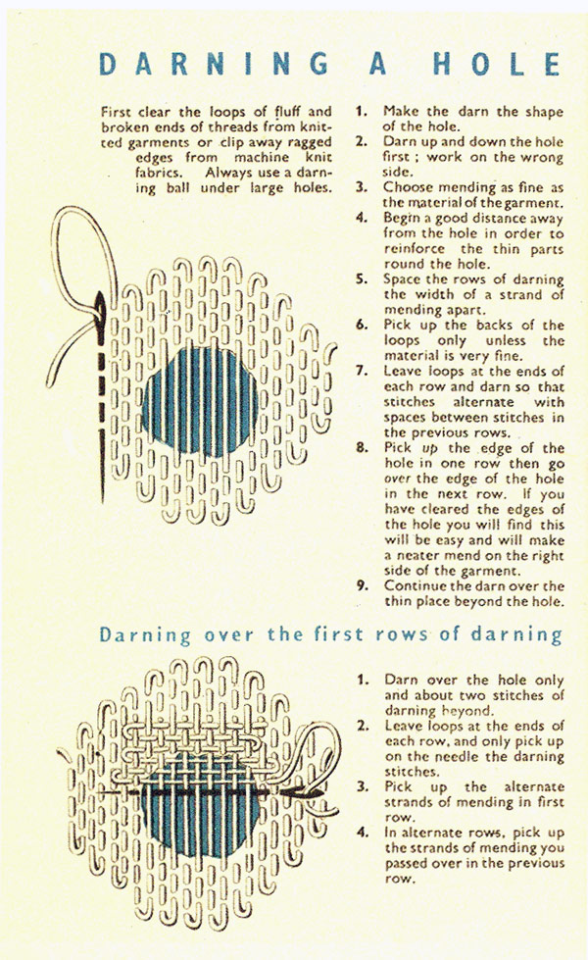
(Image source) [ID: vintage instructions on how to darn a hole.]
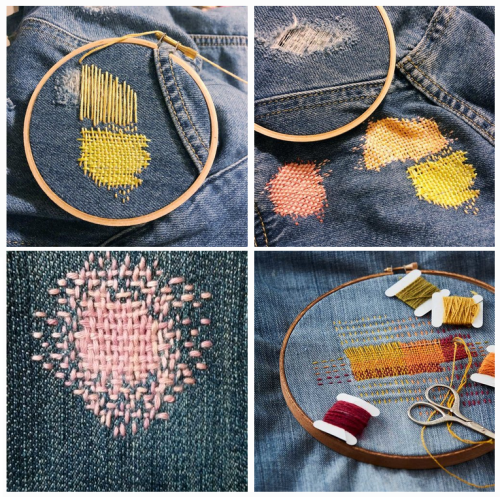
(Image source) [ID: four examples of darning on blue fabric with colourful contrasting thread.]
Conclusion:
Visible mending is a creative way to fix up your clothes and give them some personality at the same time.
You should be proud of the fact that you took the time and learned the necessary skills needed to mend your clothes! Show off what you did!
A fun side effect of wearing these obvious mends is that people will notice them. They'll remember your fixes the next time they're faced with a hole in their wardrobe, and it will make them more likely to try it for themselves.
These are just a few ways to visibly mend your garments. Want more inspiration? Check out Pinterest or r/Visiblemending on Reddit.
I have an essay brewing in my head constantly about lawns. Which, well, unsurprising, since I post about how I hate lawns all the time, but I think the "lawn" and "landscaping" centered way of thinking about Places Outside is a Bigger Thing that Connects to Other Things
(What isn't? Having ideas about concepts is always like this.)
I will introduce my ideas by a situation where they apply: Sometimes life-forms mimic other life forms. One form of mimicry is called Vavilovian mimicry, where weed species in crops grown by humans evolve over time to be more similar to the crops.
Vavilovian mimicry basically helps weeds survive because the weeds are adapted to the care-taking regimen of the crops, and because the human caretakers of the crop can have a hard time telling them apart, which means they might say "Ehh...I'll wait until it grows up so I can be sure I'm not pulling up my crop."
I think there's something similar at work among flower gardens and landscaping...but it's different.
Regular people don't know the name of every plant that might possibly grow in their flower beds, and they often pull up plants they don't know just because they don't know them. They sometimes say they pull up a plant that "looks weedy" or "looks like a weed."
I think to myself...what does "weedy" look like?
This question collided unexpectedly in my brain with an insight I had about invasive species that I could not explain.
I have to get rid of a lot of Callery pear, wintercreeper, honeysuckle, burningbush, privet, English ivy, and other plants that are invasive where I live. And strangely- many invasive plants look similar in ways they don't share with very many native species. They tend to have small, round or squat, glossy leaves, and they tend to have a very dense growth habit.
I can think of several possible explanations: Maybe these species thrive in North America today because of the loss of controlled burning, but their characteristics look so distinct next to native species because they relate to things that would make a species fire-intolerant? This doesn't seem quite right, since it doesn't predict level of fire-adaptedness in native species.
Another explanation is better: they were selected for these traits by humans for their usefulness in landscaping. Dense growth habit would be useful for creating hedges or ground covers. This is why many invasives were originally planted, right? And small leaves might feel or be perceived as less "messy" when they fall.
But I think this is a clue to something else going on. What does "weedy" look like?
Some plants go on one side of "weeds vs. flowers" and some on the other, and it's almost totally arbitrary...so how do gardeners make the call so decisively?
I think about the commonest "landscaping" plants- Knock Out roses, hostas, petunias, begonias, boxwoods and so on- they share a lot of the characteristics mentioned above. Shiny or at least smooth, typically small and squat leaves, dense and compact growth habit.
Then I think about some of the commonest and most important "weedy" native wildflowers, such as goldenrods, asters, milkweeds, Joe-Pye weed, ironweed, sunflower. They all differ from the above in at least one striking way. Mostly, they have hairy leaves and stems, long and thin leaves, and a tendency to grow up tall before blooming. Milkweed has smooth leaves, but its leaves are long and very big. Hmm...
And I think I can guess where this is coming from.
Landscaping and garden designs often look like this


See how the plants are drawn and arranged to cover a space in two dimensions, mostly not overlapping with each other? This is very easy to plan and design. And those common landscaping plants I mentioned—hostas, Knock Out roses, boxwoods, and so on—are very good at acting just like a two-dimensional representation of them does. Just look, you can see them:

Now look at those important native wildflowers I mentioned:
Goldenrod

Ironweed

Milkweed

These guys don't fill much space in a horizontal plane, they go straight up. They don't exclude other plants from very much space either. Plants could grow under them and among them. So they're not very good for "filling up" space, and their opener, lankier, less dense shape doesn't do a good job at blocking other plants from growing.
In a garden of North American prairie- or meadow-adapted plants, the plants wouldn't exclude each other and stay within their designated spots because they're evolved to intermix with a great variety of plants.

"Separateness" is a big part of the typical "landscape" aesthetic. These plants are very neatly separate from each other. This is what looks "neat" and well-kept to us...the opposite of "weedy."
This could mean our garden and flower beds are affected by a selective pressure a lot like the Vavilovian mimicry situation. But instead of weeds being selected to look like intentionally grown plants, the intentionally grown plants are being selected to look different from weeds.
The subtle difference makes perfect sense. In a field, the rule is "leave the plant there if you're unsure" because that's your food. In a flower bed, the rule is "get rid of the plant if you're unsure" because having weeds is more aesthetically unacceptable than having blank space.
The point is: Ecology needs to be a big part of gardening and landscaping, because you are DOING ecology. Even if you don't know the evolutionary principles, you're acting them out.
Just like the ineffable preferences of female birds give the males weird elaborate display structures, ineffable aesthetic "senses" that govern our "built" world slowly turn it into something weird.