Your gateway to endless inspiration
Tutorial - Blog Posts
LITERALLY FUCKING NOWHERE WILL LET ME POST THIS VIDEO SO MAYBE HERE?!!?!?!?!?!?
Its a tut on how to get MCSM, Season 2 in particular. Sorry its kinda shitty 😭 I'll make a better version if enough ppl ask me to
unary to binary (back again, an objects journey) (part 1)
ok, so last time I didn't actually get to converting from unary to binary again.
So I guess I will do that here. (HAHA I JUST GOT IT TO DIVIDE WITH REMAINDER. APPLYING THAT TO THE CONVERSION IN PART 2)
so to do this we have to find the largest power of two not greater than the number, then the largest power of two not greater then what is remaining of the number, and repeat until we reach zero.
OR we can
find the largest power of two not greater than the number, then for each power of two less than the number, if it is not greater than it, use a 1 and subtract it from the remaining number.
and then for both of these, of course, reverse the result at the end so it is in the right order.
I think so far the second one of these sounds better.
but come to think of it, repeated integer division by two might work well.
that is, instead of repeated doubling, and then checking which one is larger, it might be faster to do repeated halving. (with a remained of either zero or one)
this could be then used to make a integer base 2 logarithm, with a remainder thing.
and instead of checking each power of two less than it, we could just find the integer base 2 log, and the base 2 log of the "remainder" and the base 2 log of THAT remainder and so on.
that seems like its the best way to me so far, but how do we take the integer logarithm AND get the log remainder thing?
getting the logarithm is fairly simple, just keep dividing by the number until you reach 1.
but how do you get the remainder part? and also how do you do the integer division in the first place with these number like things that we have created?
well lets answer the first of those questions first.
It seems like the remainder of the logarithm is probably related to the remainders of the divisions that make it up.
so lets look at taking the integer base 2 logarithm of 9:
9 4 (rem 1) 2 1
that took 3 halvings, and there was one remainder of one.
what if we try on 10 or something though?
10 5 2 (rem 1) 1
that also took 3 steps and one remainder, but the remainder was on a different step.
now lets try 11
11
5 (rem 1) 2 (rem 1) 1 (rem 0)
now wait, theres a pattern here, which might allow for converting it even faster.
the remainders of the divisions are the remainders of the logs expressed in binary!
we COULD turn them back into unary, so we could take the log of it again,
but what we are doing it converting it into binary anyway! (so that would be a silly step)
so if we look at what we were doing with the repeated division again, but looking at the numbers in binary, it will be pretty evident how to convert it in a better way.:
lets try 9 again (which is 1001)
1001
100 (rem 1) 10 (rem 0) 1 (rem 0) 0 (rem 1)
whats that? the remainders are the number we want in binary?
and now that I think of that it was kind of obvious?
yes. I for some reason did not think of that earlier.
so yeah, thats what we will do, we will repeatedly integer divide the number by 2 until we reach zero, and the remainders will be the number in binary.
but wait, we haven't even written out how to divide the number by two in the first place!
well turns out its not actually that hard to do.
in a loop (that keeps looping provided the number is not zero) subtract one, and if its still not zero, subtract one again. if it is zero after the first subtracting, the remainder of that division is 1. (only the last loop will cause the remainder to be 1) count the number of times where 2 was subtracted.
so like for 5 that would be
5 3 1 1 2 0 2 (remainder 1)
so that gives the correct answer (2 with remainder zero)
ok, now to implement this integer division by 2 in drocta ~ATH (wow! already? that was fast! /sarcasm)
//given that NUM is the variable that has the name we are halving BIFURCATE [NUM,NUM]2NUM; BIFURCATE 2NUM[NUMCPY,JUNK]; BIFURCATE [BLAH,BLAH]2BLAH; BIFURCATE 2NULL[SUBCOUNT,REMAINDER]; ~ATH(NUMCPY){ BIFURCATE 2BLAH[UNEVEN,JUNK]; BIFURCATE NUMCPY[JUNK,NUMCPY]; BIFURCATE [NUMCPY,NUMCPY]2NUMCPY; BIFURCATE 2NUMCPY[NUMCPYCPY,JUNK]; ~ATH(NUMCPYCPY){ BIFURCATE [BLAH,SUBCOUNT]SUBCOUNT; BIFURCATE NUMCPY[JUNK,NUMCPY]; BIFURCATE 2NULL[UNEVEN,NUMCPYCPY]; } ~ATH(UNEVEN){ BIFURCATE [BLAH,REMAINDER]REMAINDER; BIFURCATE 2NULL[UNEVEN,JUNK]; } } BIFURCATE [NUMCPY,NUMCPY]2NUMCPY; BIFURCATE 2NUMCPY[NUMDIV2,JUNK];
ok, that should divide the number by 2, put the result in NUMDIV2, and put the remainder in REMAINDER.
this takes linear time based on the size of the unary number. (provided I didn't make a mistake)
so now it is time to make sure it works, hold on a second while I check it. (I mean, im not going to post this until after I check it, so it doesn't really make sense to tell you to wait, because you just keep reading, but as I am writing this, I am about to test it.)
ok, I tested it. and it didn't seem to work, but then I realized that I made a mistake in making the test. (I checked the wrong variable)
but yeah, turns out that works...
ok, so now we need to repeatedly divide the number by two to get the remainders.
and we need to store these remainders in a list or something.
reading binary numbers from the user, continued.
when we left off, we had code to interpret one binary number from user input, and output it as a unary number. In this post we will add the second user input, and maybe make a thing that converts from unary to binary, and then outputs it.
The code for that was the following:
import blah BLAH; print please enter whatever character you will be using for binary zero.; INPUT ZEROCHAR; BIFURCATE ZEROCHAR[ZEROCHAR,JUNK]; import chrcmp CMP0; BIFURCATE [CMP0,ZEROCHAR]D; D.DIE(); print please enter whatever character you will be using for binary one.; INPUT ONECHAR; BIFURCATE ONECHAR[ONECHAR,JUNK]; import chrcmp CMP1; BIFURCATE [CMP1,ONECHAR]D; D.DIE(); BIFURCATE [NULL,NULL]2NULL; BIFURCATE 2NULL[OUTNUM,JUNK]; print please input the binary number you want.(it will be converted to unary); INPUT BINNUM; ~ATH(BINNUM){ BIFURCATE [OUTNUM,OUTNUM]G; BIFURCATE G[NCOPY,OUTNUM]; ~ATH(NCOPY){ BIFURCATE NCOPY[JUNK,NCOPY]; BIFURCATE [BLAH,OUTNUM]OUTNUM; } BIFURCATE BINNUM[CHAR,BINNUM]; BIFURCATE [CMP0,CHAR]NEQ0; ~ATH(NEQ0){ BIFURCATE [BLAH,OUTNUM]OUTNUM; BIFURCATE 2NULL[NEQ0,JUNK]; } } print ok, going to print it out in unary, with each digit on one line. If the number you entered was large you might want to close the program instead of hitting enter.; INPUT JUNK; BIFURCATE [OUTNUM,OUTNUM]GOUTNUM; BIFURCATE GOUTNUM[OUTNUMCOPY,JUNK]; ~ATH(OUTNUMCOPY){ BIFURCATE OUTNUMCOPY[JUNK,OUTNUMCOPY]; print 1; }
ok, so what do we need to do after that?
Well we need to make it get two numbers, right?
Yes. Yes we do.
But getting one number was kind of long, wasn't it.
Luckily we don't have to have the entire thing there twice, much of it we can jusst have it in there once.
we COULD define a function, but I haven't added that to the interpreter yet, so yeah...
so a significant portion of that was initialization stuff that doesn't need to be duplicated. the first 14 lines in fact!
so pretty much we just duplicate everything but the first 14 lines.
gee, now I sound lazy for not writing this part earlier.
anyway, here goes:
import blah BLAH;
print please enter whatever character you will be using for binary zero.;
INPUT ZEROCHAR;
BIFURCATE ZEROCHAR[ZEROCHAR,JUNK];
import chrcmp CMP0;
BIFURCATE [CMP0,ZEROCHAR]D;
D.DIE();
print please enter whatever character you will be using for binary one.;
INPUT ONECHAR;
BIFURCATE ONECHAR[ONECHAR,JUNK];
import chrcmp CMP1;
BIFURCATE [CMP1,ONECHAR]D;
D.DIE();
BIFURCATE [NULL,NULL]2NULL;
BIFURCATE 2NULL[OUTNUM,JUNK];
print please input the first binary number you want.(it will be converted to unary);
INPUT BINNUM;
~ATH(BINNUM){
BIFURCATE [OUTNUM,OUTNUM]G;
BIFURCATE G[NCOPY,OUTNUM];
~ATH(NCOPY){
BIFURCATE NCOPY[JUNK,NCOPY];
BIFURCATE [BLAH,OUTNUM]OUTNUM;
}
BIFURCATE BINNUM[CHAR,BINNUM];
BIFURCATE [CMP0,CHAR]NEQ0;
~ATH(NEQ0){
BIFURCATE [BLAH,OUTNUM]OUTNUM;
BIFURCATE 2NULL[NEQ0,JUNK];
}
}
BIFURCATE [BLAH,OUTNUM]UINNUM1;
BIFURCATE UINNUM1[JUNK,UINNUM1];
BIFURCATE 2NULL[OUTNUM,JUNK];
print input the second binary number:;
INPUT BINNUM;
~ATH(BINNUM){
BIFURCATE [OUTNUM,OUTNUM]G;
BIFURCATE G[NCOPY,OUTNUM];
~ATH(NCOPY){
BIFURCATE NCOPY[JUNK,NCOPY];
BIFURCATE [BLAH,OUTNUM]OUTNUM;
}
BIFURCATE BINNUM[CHAR,BINNUM];
BIFURCATE [CMP0,CHAR]NEQ0;
~ATH(NEQ0){
BIFURCATE [BLAH,OUTNUM]OUTNUM;
BIFURCATE 2NULL[NEQ0,JUNK];
}
}
BIFURCATE [BLAH,OUTNUM]UINNUM2;
BIFURCATE UINNUM2[JUNK,UINNUM2];
BIFURCATE [UINNUM1,UINNUM1]CUINNUM1;
BIFURCATE CUINNUM1[SUM,JUNK];//haha, some junk
BIFURCATE [UINNUM2,UINNUM2]CUINNUM2;
BIFURCATE CUINNUM2[UINNUM2CPY,JUNK];
~ATH(UINNUM2CPY){
BIFURCATE UINNUM2CPY[JUNK,UINNUM2CPY];
BIFURCATE [BLAH,SUM]SUM;
}
print ok, going to print the sum out in unary, with each digit on one line. If the numbers you entered were large you might want to close the program instead of hitting enter.;
INPUT JUNK;
BIFURCATE [SUM,SUM]GSUM;
BIFURCATE GSUM[SUMCOPY,JUNK];
~ATH(SUMCOPY){
BIFURCATE SUMCOPY[JUNK,SUMCOPY];
print 1;
}
ok. That worked. I haven't made it convert the output to binary yet. I started this the day of the other post, but there was a bug I didnt get around to fixing in it that I didn't find the fix for until today.
that bug was that in the part where it changes the binary number to a unary number, the first time around, the unary number starts at zero and increases to what it should be...
...but I forgot to include the line to reset it back to zero for the second number.
but in works now.
I might make the part where it converts from unary to binary now instead of later, but I have to do stuff.
Sorry for having such a slow post rate, it is partly because I am busy and partly because I am lazy. mostly the [FORMER,LATTER].
hey, it adds the numbers that were entered in binary...
So a future improvement is to make it so it outputs it in binary as well.
Another possible future post is something that shouldn't work but the interpreter has a certain bug that might be amusing, and will not negatively affect many things.
specifically, if you have a "}" inside of a print statement, and you are jumping to the end of a loop, it will jump to the inside of the print statement, and execute the text as code. This is a bug, not a feature, so you should not rely on it when writing stuff. It might be fun to mess with though.
I might add user defined functions to the interpreter soon...
I don't feel that this post really explained much of anything, but I have to do stuff now, so I am going to post this, and possibly modify it later with clarifications.
Feel free to send me messages asking about how some part works.
User input, and a basic calculator.
Most programs people use have some form of user input. A calculator isn't much use if it always uses the same numbers after all!
~ATH of course accepts user input and output as shown in the file Roxy sent Jane.
Also I just found out you can put more than one read more line in one post.
The input command has the syntax:
INPUT VARNAME;
What this does is when program execution meets this line, the program pauses execution, allowing the user to input text. When the user hits enter, program execution will continue and the variable VARNAME will be made to point to an object corresponding to the text the user entered.
This object is such that the left half is the object that corresponds to the first character. If there is no character after that, the right half will be the NULL object. Otherwise the right half will be the object corresponding to the input without the first character. If they hit enter without inputting any characters the object will just be the NULL object.
Now that we have that all explained, we can start to make programs that actually take user input!
As you might have guessed from the title, the thing we will be making is a very basic calculator. All it does is add two numbers, like in the last example.
But in this, it will get the numbers from the user!
One simple way to do this is to use the length of the input text as the number: The way we define what we call numbers just so happens (heh) to be such that if we interpret the object for the input string as a number, the number will be the same as the length of the input!
This isn't the greatest solution, but it is easier than other methods. We will use this method first and then move on to other methods that are harder to write, but will be nicer when using the end program.
HERE WE GO:
ok, so like I said, much of it is pretty much the same as that previous program, so we might as well just include said here:
SOME CODE TO GET A AND B HERE import bluh BLAH; BIFURCATE [BLAH,A]ATEMP; BIFURCATE [BLAH,B]BTEMP; BIFURCATE ATEMP[JUNK,ATEMP]; BIFURCATE BTEMP[JUNK,BTEMP]; BIFURCATE [BLAH,NULL]C; BIFURCATE C[JUNK,C]; ~ATH(ATEMP){ BIFURCATE ATEMP[JUNK,ATEMP]; BIFURCATE [BLAH,C]C; } ~ATH(BTEMP){ BIFURCATE BTEMP[JUNK,BTEMP]; BIFURCATE [BLAH,C]C; } BIFURCATE [BLAH,C]CTEMP; BIFURCATE CTEMP[JUNK,CTEMP]; ~ATH(CTEMP){ BIFURCATE CTEMP[JUNK,CTEMP]; print some text; } print DONE!;
so pretty much what we need to do it put the code to get A and B where that goes(at the beginning), as well as stuff to tell the user how to print stuff.
Like I said, the objects from the input commands can be interpreted as numbers.
so this becomes:
print INPUT SOMETHING WITH THE NUMBER OF CHARACTERS AS THE FIRST NUMBER YOU WANT TO ADD; INPUT A; print INPUT SOMETHING WITH THE NUMBER OF CHARACTERS AS THE SECOND NUMBER YOU WANT TO ADD; IMPORT B; import bluh BLAH; BIFURCATE [BLAH,A]ATEMP; BIFURCATE [BLAH,B]BTEMP; BIFURCATE ATEMP[JUNK,ATEMP]; BIFURCATE BTEMP[JUNK,BTEMP]; BIFURCATE [BLAH,NULL]C; BIFURCATE C[JUNK,C]; ~ATH(ATEMP){ BIFURCATE ATEMP[JUNK,ATEMP]; BIFURCATE [BLAH,C]C; } ~ATH(BTEMP){ BIFURCATE BTEMP[JUNK,BTEMP]; BIFURCATE [BLAH,C]C; } BIFURCATE [BLAH,C]CTEMP; BIFURCATE CTEMP[JUNK,CTEMP]; ~ATH(CTEMP){ BIFURCATE CTEMP[JUNK,CTEMP]; print some text; } print DONE!;
So yeah. That should work. I still need to test this, but I am pretty dang sure that this works.(have to go do homework now) In the next post I will explain how to make it so that the user can type in the number as an actual number!
Conditionals and (finite) loops
In drocta ~ATH, the control flow (what part of the program is run when) is almost entirely determined by ~ATH loops.
The only case where it isn't is when the object initially pointed to by THIS dies. That ends the program immediately.
This post will show in more detail the basics of its usage.(also introduces the variable NULL)
Is there anything in this post that needs to be clarified?
In a program, you might want something to only happen if something else is true, or you might want it to happen provided that something had not happened.
In many programming languages you would use a command called if.
drocta ~ATH does not have an if statement.
Instead, you create a loop on an object, and inside the loop kill the object.
A little morbid, but isn't ~ATH always?
for example:
SOMECODEHERE ~ATH(SOMEVAR){ SOMEVAR.DIE(); SOMEOTHERSTUFF } SOMEOTHERSTUFF
However, this isn't the only way. There is another way that is likely preferable in most situations. I just thought this way was the most obvious, and would be an easy way to explain the other method, which is quite similar.
The loop doesn't exactly wait for the object to die, but rather repeats so long as the variable points to an object that is alive. The variable can be made to point to an object that is not alive, either by make the object it points to DIE(), or by making it so it points to a different object that is ALREADY DEAD.
(How can you expect to kill it, when it is ALREADY DEAD?!? haha)
So if the object you wanted the part of the script to run if it was alive was important, and you didn't want to kill it, you could just do this:
BIFURCATE [IMPORTANTOBJECTVAR,IMPORTANTOBJECTVAR]BLAH; BIFURCATE BLAH[V,V]; ~ATH(V){ BIFURCATE [V,NULL]V; BIFURCATE V[JUNK,V]; OTHER CODE TO ONLY EXECUTE IF IMPORTHATOBJECT IS ALIVE }
Thats nice to be able to do, isn't it.
In fact, it leads nicely into how to make loops that go around a fixed number of times.
suppose if you had
BIFURCATE [BLAH,NULL]V; ~ATH(V){ BIFURCATE V[BLAH,V]; DO OTHER STUFF, POSSIBLY WITH BLAH } MORE STUFF
V would initially be alive, so it would go into the loop, but then V would be made to point to the NULL object, which is dead, so it wouldn't loop the second time.(it would skip to after the loop
that would do the stuff in the loop once.
now what if you wanted to do it twice?
Just make it so it has to bifurcate the thing twice before moving on! Like so:
BIFURCATE [BLAH,NULL]V; BIFURCATE [BLAH,V]V; ~ATH(V){ BIFURCATE V[BLAH,V]; DO OTHER STUFF, POSSIBLY WITH BLAH } MORE STUFF
this way it will go through the loop, pop off the one side of V, doing the other stuff in the loop. V will still point to something alive after this, so it will do it again, but this time, when it pops off one side of V, the result will be the NULL object, so it will stop.
Thats a loop that goes around twice!
This can be extended to as many number of repetitions as follows:
BIFURCATE [BLAH,NULL]V; BIFURCATE [BLAH,V]V; BIFURCATE [BLAH,V]V; BIFURCATE [BLAH,V]V; ETCETERA BIFURCATE [BLAH,V]V; ~ATH(V){ BIFURCATE V[BLAH,V]; DO OTHER STUFF, POSSIBLY WITH BLAH } MORE STUFF
where the loop will go around however many blahs there are attached to the NULL, because it will keep popping the BLAHs of until it reaches NULL.
The variable V is being used to store how many more loops need to be executed, Which is a number.
V is being used to store a number.
You might be thinking something along the lines of
"Well this is all very nice, but that seems to only allow for loops that loop a predetermined amount of times."
NOT SO!
You can have another loop that makes a variable point to a number, which would then be in another loop! For example, the following will add two numbers in A and B, store the result in C, copy that result to CTEMP, and then print "some text" the ammount of times in CTEMP!
SOME CODE TO GET A AND B HERE import bluh BLAH; BIFURCATE [BLAH,A]ATEMP; BIFURCATE [BLAH,B]BTEMP; BIFURCATE ATEMP[JUNK,ATEMP]; BIFURCATE BTEMP[JUNK,BTEMP]; BIFURCATE [BLAH,NULL]C; BIFURCATE C[JUNK,C]; ~ATH(ATEMP){ BIFURCATE ATEMP[JUNK,ATEMP]; BIFURCATE [BLAH,C]C; } ~ATH(BTEMP){ BIFURCATE BTEMP[JUNK,BTEMP]; BIFURCATE [BLAH,C]C; } BIFURCATE [BLAH,C]CTEMP; BIFURCATE CTEMP[JUNK,CTEMP]; ~ATH(CTEMP){ BIFURCATE CTEMP[JUNK,CTEMP]; print some text; } print DONE!;
YAY! We just added two numbers together! In similar ways, we can also subtract, multiply, divide, etcetera!
if some of this was unclear I would appreciate requests for what needs to be clarified.
Is there anything in this post that needs clarification?
Syntax explanation post completed, and Hello, World.
I have completed the syntax explanation post, and I think it is fairly clear now.
If you find any part of the post to be unclear, and that it requires further explanation, please say so so that I can improve it.
Now that that post is in an acceptable form, We can get on to writing our first few ~ATH programs.
print Hello, World.; THIS.DIE();
That wasn't so hard, was it?
I feel I should note that the syntax of the print command is not entirely finalized, it might change sometime later.
EXPLANATION:
The first line of the program says to output the text "Hello, World."
The 2nd line of the program says to end the program. This is because the variable THIS initially points to a object that is only alive when the program is running. If the object is ever not alive, the program stops.
oh gosh why is this a bullet-ed list I am not good with tumblr
To run a drocta ~ATH program, you need the interpreter (available from the github), and python 2.7 (the interpreter can be easily modified to run with python 3, but it is written to work in 2.7)
Open interp_2.py with python, and when the program comes up, type in the filename of the ~ATH program, and hit enter, this will run the ~ATH program.
With this example, it should output the text
Hello, World.
Now, of course, this is a relatively simple program, but at least its something.
Depending on how you are running the interpreter, the program might close immediately after outputting the text.
That might not be what we want.
To make the program not close until we specifically tell it to, we use the following:
print Hello, World.; ~ATH(THIS){ } THIS.DIE();
EXPLANATION:
The first line is the same as in the first program. It outputs "Hello, World."
The second line is different, this says to start a loop, which will continue until the object pointed to by the variable THIS is dead.
The third line says to go back to the corresponding ~ATH statement.
The fourth line is never executed, because the loop above it will continue until the object pointed to by THIS dies, and if that object dies the program ends. If it were to be executed it would make the object pointed to by THIS die, and the program would end as a result.
This program should be the same, except that it will keep running until you close it manually.
Now you have hello world written in two different ways!
Syntax explanation
~ATH is a programming language. A programming language is a language that can be used to write programs in, that can afterwards be run. ~ATH appears in Homestuck, and drocta ~ATH is my attempt at making it a real thing.
drocta ~ATH is limited to what is physically possible of course, because it actually exists. It is also limited to fit well with the comic, and how much of it I have created so far.
As such, so far all the programs that can be written in drocta ~ATH are text only, do not yet accept input (input in progress), and tend to be stupidly long.
It is however capable of computing anything a computer can given enough time and memory.
~ATH is based on objects, and the lives thereof.
For example, in homestuck, there are programs that relate things to the lifespan of a universe, or a person, etc.
Of course, in order to make an interpreter possible, we have to limit ourselves to virtual objects. Ones that do not actually exist.
References to these objects are stored in things called variables. You probably know what these are already, but if you don't, think of a variable as a box that can have a thing in it. Each box has a name. You can say "do something with whatever is in the box called "apple".
In ~ATH, every object is either "alive" or "dead". Note that it is the object that is alive or dead, not the variable that refers to the object.
Now onto the actual syntax!:
Currently(as of build 7), drocta ~ATH has 5 different commands: import, ~ATH(){}, .DIE();, print, and BIFURCATE.
First we will go over the import statement. The import statement has the purpose of creating a new variable and a new object. Unlike other operations that can create a new object, the object created by import is initially unrelated to all of the other objects.
The syntax of the import command is:
import anything other than semicolons here VARIABLENAME;
The things between import and the last space before the semicolon are ignored.
In future versions, the import statement might also do additional things, such as using things from other files. But for now it just initializes variables.
EXAMPLES:
If you wanted to make a new variable called BANANA, and you wanted the reader to know that BANANA is a fruit, you would say:
import FRUIT BANANA;
or you could say
import YELLOW FRUIT BANANA;
The things that go before the variable name don't actually matter, you can say
import ghsdgh hgsdkhg hgksdhg hgskdjg BANANA;
if you wanted.
Now for the next command: The eponymous ~ATH loop!
The syntax of it is as follows:
~ATH(VARNAME){ Some other code goes here }
What this does, is each time the code execution gets to the ~, it checks what the variable in the parentheses is, and then checks the object the variable points to. If the object is alive, it continues. If the object is dead, it skips to after the }. When the Code execution reaches the }, (that is, if it did not skip to after it), it will jump back to the corresponding ~. Code execution will keep going around in this loop until the object pointed to by the variable is not alive. In later versions, there may be an additional requirement that the } be followed by EXECUTE(code here); Where code here can be replaced with ~ATH code, NULL, or possibly a file name. But currently, this is not the case. Now onto the command BIFURCATE!: Bufurcate actually has 2 forms, the standard bifurcate, And the reverse bifurcate. The first of the two has syntax as follows:
BIFURCATE VARNAME1[VARNAME2,VARNAME3];
What this does, is it takes the object pointed to by the first variable, and determines two objects, which are stored in the other two variables. The two objects determined will always be the same for a particular object. If you for example say:
BIFURCATE V1[V2,V3]; V2.DIE(); BIFURCATE V1[V4,V5];
then V4 and V2 will point to the same object, which will be dead.
The other form of the BIFURCATE command has syntax as follows:
BIFURCATE [VAR1,VAR2]VAR3;
This is pretty much the inverse operation. That is, it undoes the other one. If you say for example:
BIFURCATE A[B,C]; BIFURCATE [B,C]D;
then A and D will point to the same object. To be clear, undoing the other is not the only time you can use it. It will take any two objects, and determine an object from those two. If there is already an object for the combination of those two, then that object is the resultant object. If none has been created yet (and the two arent split from something in that order), it will create a new object, which it will put in VAR3.
To be clear, if you say:
BIFURCATE A[B,C]; BIFURCATE [C,B]D;
A and D will NOT point to the same object, unless you create A such that B and C are the same. That is, if you say:
BIFURCATE [Y,Y]A; BIFURCATE A[B,C]; BIFURCATE [C,B]D;
A and D WILL point to the same object, and B and C will both point to the same object as Y (and as each other).
The Final command is print.
print is pretty simple, but its syntax might change somewhat.
Currently the syntax is:
print the text you want to output;
Note the semicolon. the semicolon is important.
So hello world would be
print Hello, World.;
SYNTAX EXPLANATION COMPLETE! PLEASE SUGGEST CLARIFICATIONS IF NECESSARY.
MESSAGE END.
Welcome.
If its not obvious, this blog will teach techniques in a version of ~ATH Specifically, drocta ~ATH. And yes, I'm serious. I believe that I probably am the author of the longest ( possibly up to third longest) ~ATH program. Specifically, bubble sort. Further, I believe I am the author of the first ~ATH interpreter. (I am the drocta of drocta ~ATH) Link here: http://www.mspaforums.com/showthread.php?50314-ATH-interpreter This blog is intended to serve as a tutorial on writing things in drocta ~ATH. First I will go over the syntax. Then how to make conditional like things. Then how to make finite loops. Then perhaps storing "numbers". Then copying "numbers" Then comparing "numbers" Then lists In such a way I intend to work our way up to you understanding how to write bubble sort in drocta ~ATH. After that, we might even implement brainf*** in it. Or a universal Turing machine. Of course, when I say "numbers", the quotes are there for a reason. Numbers are not built into drocta ~ATH. One has to build them. Now how do I tag things...? Ah, that's how. In case it wasn't clear, the interpreter for drocta ~ATH does not attempt the impossible. It cannot trigger the apocalypse. It's just a python script that interprets ~ATH scripts. Don't worry if you don't already know how to program. I intend to make the posts fairly accessible.
Hey!
I am doing somewhat urgent school help for money (as I need money for a mobility aid, money that I do not have). I have made a Discord server for it- all the info is in there. If you need help with English (Reading, Writing, Grammar), Art, Creative Writing, or SOME Math stuff, join the discord server linked for more info!
Thank you!


Hello, I made a tutorial on how I do my stuff, (not really but moreso the whole 3d look and stuff) I hope it’s okay that I share this!
You are allowed to use this tutorial for anything if you need it,
Your art (or whatever you create!) will always and forever be lovely, so let nobody else tell you otherwise ❤️

Wat do you animate with !!? If ur comfortable sharing!!
live2d if you cant afford or get a free copy of live2d(trial or demo ver) i recomend dragon bones , if not i recomend spriter, you can do straight up pixelart with this!! (but bro is limited!!)
heres process, Its A BIT TOO MUCH
I WILL EVENTUALLY DO A YOUTUBE VIDEO THIS IS THE BEST I CAN DO
For the live2d 1. I would make the character in sai/or your program of choice that can export into psd like this, (look into how vtuber models are separated in case you're not sure)

even simple it follows the rules of a regular vtuber model (some features wont be needed like mouth unless you know EXACTLY what you want to do) here is how the last one i made looks like (you can see head, hair, back of the eyes, iris, arms, blush completly separated)

2. Once in live2d you can rig it as a regular vtuber model, add or ignore parameters youre going to use. like for example this one doesnt use x eye movements (eye doesnt move from side to side basically), but i added new ones like the legs (remember to add physics!!!)

3. Now its time to animate, dont worry if you add new parameters to the rig to fit the animation you had in mind it will update as you go on!!! !!! important!! make sure you are using the double size you're going to use for the pixel, if you want your pixel to be 200x200 you'll be using 400x400 when you work in it in live2d!!!!

now use the parameters you did to do the animation

if you want it to loop do it like this (rec!!) copy and paste the first one and the last one.

lastly for give it a pixel art timing look, i rec do this insert frame on the one of the keyframes (most relevant!! look into an animation tutorial to see what i mean!!!)

and now what you are going to do is move it into 3/2 more keyframes so the movement is heavier and more exagerated!!!

once youre happy with the results, export to gif!!!


ALRIGHT FOR THE NEXT PART!!!!!!
4. With the gif in hand send it to https://ezgif.com/gif-to-sprite this will turn your gif into a sprite sheet
heres mine

how what youre going to do is give this sprite sheet to this program Pixelatir (i belive its free!!, at least it was when i got it :O) /i think if its for commissions you need to pay them but look deeper into the TOS if you're invested!!! i heard photoshop does this too but im not sure!!!

you'll have to make the settings right but if you have a palette in mind you can feed it and it will use it!!! when its done, i suggest taking the now pixelated sprite sheet and fixing any small details by hand , like for example in mine i aded some lines and changed hue/saturation by hand!!!

Now you're going to feed it back into https://ezgif.com/sprite-cutter and cut the sprites, if you did it right, thre should be no problem, and it will allow you to make a gif with it!!!
AND that should be all! hope it helped!!

Little Witch 🧚🏼♀️✨
Happy #PrideMonth to all my lgbtq+ friends 🏳️🌈✨
This was one of my old sketches turned into a digital piece. I think she came out super cute and if you guys want to give her a name you can totally leave some suggestions in the comments 😚✨
If you want to see the process follow my tiktok/Insta (https://linktr.ee/LissyDraws 💕)

Princess 🧝♀️✨
I wanted to change things up by doing a full painting. I don’t normally do backgrounds so this was a step out of my comfort zone but I like how it came out :) I hope you guys like it to 💕
(⚠️Please do not trace, reupload or share this image without crediting me ty ~😋)
Insta: LissyDoodles
Tiktok: Shizzura
Artfol: LissyDraws
Bubblehouse: LissyDraws
Enviorment brushes: @Taozipie on insta

someone asked how i draw grass, so i made a little layer breakdown of the process.
brushes: only two for the grass, although you only really need one! one of them was for the strands of grass (just a pencil-y brush, had to do one blade at a time), and another to create those tiny cluster of dots! you can skip em, or do em by hand. the flowers were done using the same two brushes.
art program: sai 2, although you can do this in almost any art program!
this tutorial is also very helpful! it’s the one i based my breakdown off of.
and as always, study other people’s art and try to see how they do it! hope this helps!

Oct. 2020 Update:
I recently got an access request for PDF 09, which surprised me because it’s supposed to be available for anyone with the link. I’ve double-checked the file’s visibility settings, and I’ve recreated the link in this post (just in case I’d used the wrong URL before). If anyone still has trouble with access, please let me know!
Original message:
Hey folks! Paul here, with one more TUTOR TUESDAY goodie: For ease of downloading, I’ve taken all the PDFs and compiled them into a…
COMPLETE .ZIP OF TUTOR TUESDAY COLLECTIONS! (~120MB)
And once again, here are the links to individual collections:
TutorTues_PDF_01_Fundamentals1.pdf
TutorTues_PDF_02_Fundamentals2.pdf
TutorTues_PDF_03_Environments.pdf
TutorTues_PDF_04_Scenery_&_Props.pdf
TutorTues_PDF_05_Positivity.pdf
TutorTues_PDF_06_Color_Theory.pdf
TutorTues_PDF_07_Digital_Color.pdf
TutorTues_PDF_08_Digital_Tools.pdf
TutorTues_PDF_09_Human_Anatomy.pdf
TutorTues_PDF_10_Specific_Anatomy.pdf
TutorTues_PDF_11_Facial_Features.pdf
TutorTues_PDF_12_Faces_&_Expressions.pdf
TutorTues_PDF_13_Hair.pdf
TutorTues_PDF_14_Clothing_&_Accessories.pdf
TutorTues_PDF_15_Animal_Features
If you enjoy these, please send your love to Meg’s personal, @rawranansi. And stay tuned for news on where Tutor Tuesday might go next!
Paul


I have to draw a lot of gold and metal for my work, but wasn't happy with any of the metal tutorials i could find around. I prefer really specific instruction, so after some research i put together what i think works as a generalist's guide/tutorial. Not perfectly accurate, but i hope it's helpful!


Good news! You CAN rewire your brain. Through the same mechanism as forming habits, you can change your automatic thought patterns. When you catch yourself with unhealthy thoughts, STOP, and make a conscious effort to replace that thought pattern with a more beneficial/healthy thought pattern. Keep doing that whenever those thoughts occur. Slowly but surely your mind’s default voice will match what you’re teaching it.
Follow @productive-tips for more tips and content like this posted daily! Handpicked and curated with love :)

22/100 days of productivity: Today was so stressful: I had 2 kholles. A kholle is a specific oral exam in french school system particularly in preparatory class. A kind of equivalent seems to be tutorial. I'm not totally sure about it though. Anyway, I was so exhausted after it that I came for a walk and come back an hour later for my last class of the day where I was not productive at all. Back home, I had an assignment which involved watching videos about fluid studies. That was funny. PS: I am totally left handed. I mean, I can't use my right hand like other left handed do. I always use my left hand to use a mouse which seems to be usual for a lot of people.


21/100 days of productivity: Time run so fast, I'm totally nervous about school. I spend my whole Sunday working on various assignments. Tomorrow is the deadline to register engineer' school. I am so nervous even if I finished yesterday.


[ID in alt]
Tutorial on drawing characters/OCs who have some sort of facial paralysis. It doesn't cover all possible variants because I was using mirror as my main reference lawl
Keep in mind that this is an introductory drawing tutorial and has some generalizations in it, so not every “X is Z” statement will be true for Actual People 👍
Consider supporting me on ko-fi if you find this to be helpful.
i watched one (1) video on how to draw hands that changed my life forever. like. i can suddenly draw hands again

these were all drawn without reference btw. i can just. Understand Hands now (for the most part, im sure theres definitely inaccuracies). im a little baffled
Hey i’m a fashion design student so i have tons and tons of pdfs and docs with basic sewing techniques, pattern how-tos, and resources for fabric and trims. I’ve compiled it all into a shareable folder for anyone who wants to look into sewing and making their own clothing. I’ll be adding to this folder whenever i come across new resources
https://drive.google.com/drive/folders/16uhmMb8kE4P_vOSycr6XSa9zpmDijZSd?usp=sharing
How to draw: Not white characters
How to draw a Black person
How to colour Black people skin tones
How to draw dreadlocks
How to draw African hair
How to draw curly hair
How to draw braids
How to draw braids part 2
How to draw cornrows
How to draw Bantu knots
How to draw two strand twists
How to draw an Asian person
How to colour darker skin tones with alcohol markers
How to draw hijabs/traditional Muslim hair coverings
How to draw a hijabi girl
All links and art provided by @ itsajart on TikTok
Before you go “mY aRt sTyLe iS dIfFrEnT tHoUgH” you can moderate it and play around with your style to get it to fit.
teach me?? how to draw?? the action of kissing????


Step 1. yearn

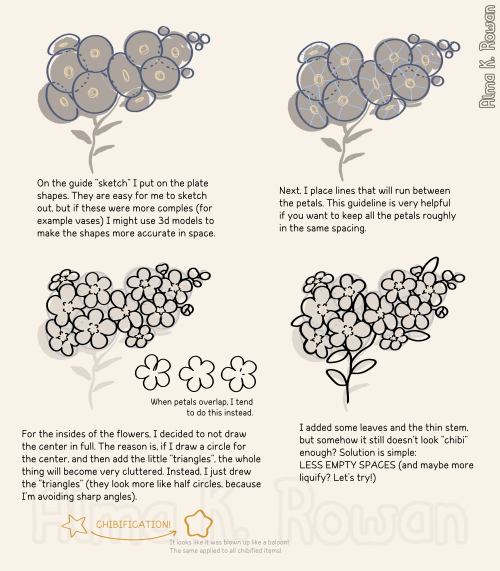
Part 1 of big "how to chibi-fy this flower????" guide is here!!! 🥰


me: *writes fic*
me: great! time to post to ao3-
ao3 summary box: *exists*
me:
ao3 summary box:
me:
ao3 summary box:
me:
Tool - Find Sims3 CC on Exported Sim Package Files
Hey y’all! Have a gift! I didn’t create this. It was coded by my son, Kitlith. He came up with the idea to help me, and we both thought others could be helped by this tool as well.
A few disclaimers first: 1. This will only work completely for the person who CREATED the sim the tool is used on. It will not be able to identify CC you do not have.
2. This will only work if your CC is installed as .package files.
3. Most of the testing for this has been done on a PC running Windows 7 (my computer). We had at least one person test on Windows 10, but it’s possible there will be issues with other operating systems that we haven’t encountered yet.
4. We have written a text file that accompanies this tool, with instructions, and edited for clarity. PLEASE READ THE INSTRUCTIONS.
5. There is a link in the text file to the source code on GitHub, and THAT is where you should report any issues you encounter with this tool. You can message me about it, but chances are I won’t be able to help you. My son is the programmer, not me. ^-^;; He doesn’t use Tumblr.
6. Last, but by no means least, this tool will be easiest for you to use if you are using CC magic for your CC. However, instructions are included for altering the search folder if you are NOT using CC magic. So again, please read the instructions.
Okay, here’s the link where you can download the tool!
I hope this will be helpful to others! It’s certainly going to make it EASY for me to answer WCIF questions for anything on my Sims.
DOWNLOAD: HERE
Are there any good creators who post blender tutorials on patreon in the Sims community? Even out of the Sims community is cool too. I'm willing to pay for good quality tutorials with access to reach out to the person if I need help. Also if you know any creators who post nomad sculpt tutorials that would be awesome!
Tutorial: Using Bulk Rename Utility to rename your CC files
This morning I thought I was in for a hell of a job, given that I’m doing a complete overhaul of my installed CC, but this fantastic little program made fast and light work of what could have been a daunting task.
Renaming files worked for TS2 players, and I’ve seen reports that it also helps speed up loading time for TS3 players, so I figured why the hell not give it a go.
I have tons of CC installed (probably close to around 19GB of the stuff, mostly build and decor items) and it’s all through CC Magic. When I first start CC Magic and fire up a new game, it can take something close to 15-20 minutes before the Maxis load screen starts (although, if I quit TS3 but keep CC Magic open, then restart TS3, it loads quickly; it’s the initial load that takes forever).
Oh, and my Decor folder is an absolute mess. I dread clicking into it, either deliberately or accidentally, because it takes about 2 minutes to do anything. So a good re-organise and cull of old CC was in order, and the renaming of files was the first part of it.
ETA: Apologies. This is a very long post. I should have put it under a Read More, so I’m doing that now.
Czytaj dalej
hello! i've been looking for a tutorial for how to make a single sim look blurry (to give the effect of moving quickly) but i cant find one anywhere? u use this effect a lot so i was wondering if u could link one? thx in advance!

Keep reading